Tarp Tutorial
Below are some great tarp set-up diagrams and FAQ by DPM. DD Hammocks asked permission from Roger Caffin to add his diagrams and FAQ to our website. We're very grateful to Roger. For the more serious tarp users DPM has another page on Tarp set-up here - some very interesting and slightly more complicated set-ups.
Send any comments to the maintainer Roger Caffin
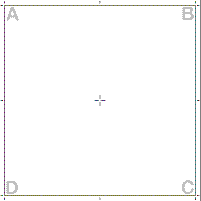  No Folding is necessary. NOTE - If using the Mushroom model, the rooflines from the centre pole to the tarp corners will vary in curvature depending on whether or not the tarp is a 'plastic' poly-tarp, or is a 'fabric' rip-stop nylon fly. If well-defined ridges are needed, use either ridgepoles, or taut ropes. |
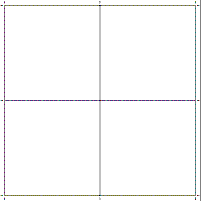
Generic Square Tarp. Template for designs using Square Tarps (10' x 10'). Crosshairs show Midpoint, short lines are Mid-sides. 1. Ground Sheet.  Lay tarp on ground and secure 4 corners for easy to clean living surface. 2. Lean-To.  Secure 2 corners of one side to ground on Windward side. Support 2 corners of opposite side in air on Lee side. 3. Fly Sheet.  Support 4 corners in air to make a weather shed. 4. Mushroom.  Support centre point in air. Use pole with rounded object on tip to avoid damage to tarp. Secure corners A, B, C, and D to ground with rope. |
||||||||||||||||||||||||||||
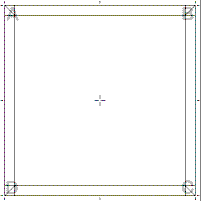 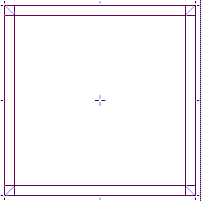 This design helps keep things tidy and dry. Create a more comfortable living space by attaching a Mosquito Net to the edges of the Tub floor with clothes pegs. |
Generic Tub Floor. Turn a groundsheet into a Tub Floor, by folding the corners in a certain way. The reinforced grommets in the corners will interfere with the folding plan, but there should be enough flex in the tarp to make the folds 'near enough'. About 6 inches (15 cm) in from all 4 sides of the tarp, make a crease line. This will become the line at which the groundsheet ceases to be the 'floor', and becomes the 'wall' of the tub floor. In the 4 corners of the tarp, the crease lines will overlap, making corner squares. Make diagonal folds in the corner squares, with the fold line coming in from the outermost corner. Fold up the 'walls' of the Tub floor. The diagonal creases in the corner squares will allow spare material to fold 'bellows' style, into flaps that can point inside or outside of the walls of the Tub floor. 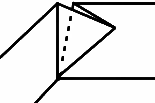 Secure folded material to one side of the Tub floor 'wall'. This will help to 'square up' wall corners. 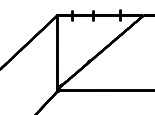 Note Grommets will stop the fold being perfect. |
||||||||||||||||||||||||||||
 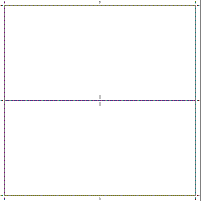 Fold shown at Half-way mark. In most Real Life cases, the fold line will depend on the amount of ground cover required... 4. Envelope (Fold Under) Continued... Secure lower half to ground, with fold on Windward side. Support free corners in air, on Lee side. |
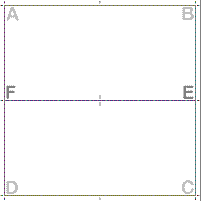
1. Doubled Wall Lean-To Fold in Half. Support mid-line fold EF in air. Secure hanging corners to ground on Windward side. 2. A-Frame Fly.  Support mid-line EF in air, low enough that the 4 corners A, B, C, D lie loosely on the ground. Move an edge lying on the ground (AB or CD) away from the mid-line EF, until the fabric is taut, and the edge begins to lift from the ground. Secure spread edge to ground, and repeat process in the opposite direction with other trailing edge. 3. Wind Shed (Fold Over).  Secure an edge (AB or CD) to ground on Windward side. Support mid-line FE and remaining corners in air on Lee side. 4. Envelope (Fold Under).  |
||||||||||||||||||||||||||||
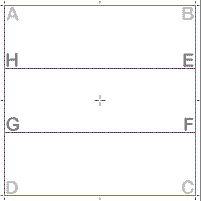 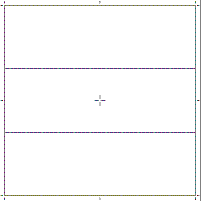 Folding in Thirds - measure or 'estimate' fold marks by folding tarp so the ends overlap, then adjust the amount of 'over fold' until there is no spare material left that isn't overlapped. 3. Square Arch (Continued). Support points E, F, G, and H in air, secure corners to ground. Greater headroom, straighter walls, but angle slope of roof, or else rain and debris will collect. |
1. Body Bag (Tube Fly).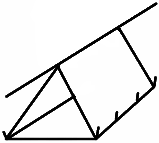 10' x 10' Tarp creates a Body Bag with 60° walls, 2.886 high, with floor space of 10 x 3.333. Fold tarp into Thirds. Secure 4 corners of one end-third to ground, with unfolded edge on Lee side. To keep the ground fold on the Windward edge straight, reinforce with a taut rope running along the fold inside the tent. Turn middle section into sloping wall by supporting the fold line between it and last end-third section in air over the ground. Secure free ends of last end-third section to ground on Lee side. 2. C-Fly (Wind Shed).  Pitch as Body Bag above, but support free ends of last end-third section in air on Lee side as an awning. A downward angle aids weather control. 3. Square Arch. 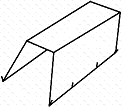 |
||||||||||||||||||||||||||||
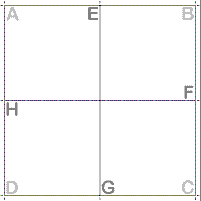  Fold in half, then fold in half again crossways to the original fold. |
Quartered Fly.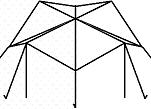 A Fancier version of the fly, more suitable to use as a garden marquee for a party. Support Midpoints of E, F, G, and H in the air. Use ridgepoles or taut ropes to reinforce the roof, and get straight ridgelines. Run ropes from corners A, B, C, D and secure to ground. The angled slope from the tarp's midpoint to the four corners, will shed rain like a four-cornered 'gutter'. The use of ropes to tauten the sloping walls will help direct water runoff. |
||||||||||||||||||||||||||||
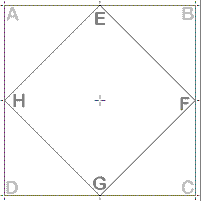 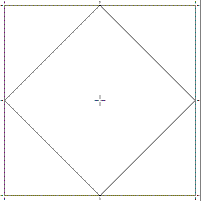 Fold points are the half way marks on each side of the Square Tarp. 3. Walled Mushroom. With a centre pole to support the midpoint of the roof support, the Rain catcher becomes a semi-walled Mushroom fly. The amount of headroom gained isn't much, but it can help. |
1. Adirondack Wind Shed.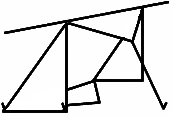 10' x 10' Tarp creates an Adirondack with 45° walls, 5 high, with floor space of 5 x 7.071. Rotate plan until diamond EFGH looks like a Square in the larger diamond of ABCD. Face point of bottom triangle AWAY from the wind, and secure the 3 corners of the bottom triangle to ground. Fold the rest of the tarp over the triangular groundsheet, AWAY from the wind. This turns Square EFGH into a main wall on the Windward side. Support fold-line making the base of Top Corner Triangle in air on Lee side. Support point of Top corner triangle in air on Lee side, or fold down for a partial wall. Fold Left and Right side triangular corners inwards until points touch ground, then secure as partial walls. 2. Rain Catcher.  Support points E, F, G, and H in the air. Run ropes from corners, A, B, C, D and secure to ground. 3. Walled Mushroom.  |
||||||||||||||||||||||||||||
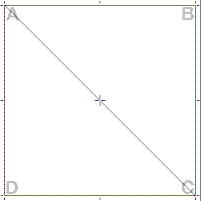 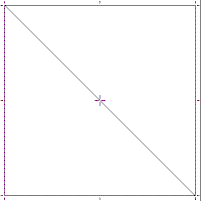 Fold in half diagonally. |
1. Shade Sail. Open and airy, and like the name implies, little more than a Shade Sail. Support ends of diagonal fold line AC in air. Secure other corners to the ground, on Windward and Lee sides. 2. Diamond Fly. 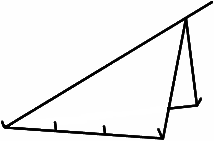 Better stability in windy conditions, IF set-up properly and staked out securely. Secure a corner containing the diagonal fold line AC to ground on Windward side. Support other end of diagonal fold line AC in air on Lee side. Spread corners B and D out until taut, then secure them to ground. 3. Tortilla. 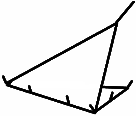 Fold Over Wind Shed. Orient so diagonal fold line AC is on Windward side. Secure three corners of lower triangle to ground. Reinforce fold line with a taut rope running along the fold inside the tent. Support free corner in air on Lee side. |
||||||||||||||||||||||||||||
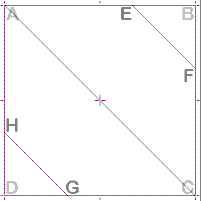 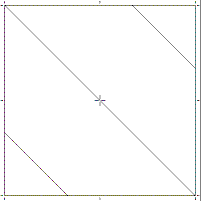 Fold in Half diagonally, then fold each diagonal Half in Thirds. Small corners are the last third on either half-side. |
Canvas Gunyah. A more stable version of the Shade Sail. 10' x 10' Tarp gives a Canvas Gunyah with 60° walls, 4.082 high, with floor space that expands from 4.714 x 4.714 in the centre, to more beneath the 14.142 awnings (4.714 x 9.428 overall). Fold in Half diagonally. Fold each diagonal Half again into thirds. Small corners are the last third on either half-side. They become partial groundsheets. Lay on ground and bring tips of groundsheet corners together. This orientates stake points. Secure groundsheet triangles to ground. Support ends of diagonal mid-line AC in air. |
||||||||||||||||||||||||||||
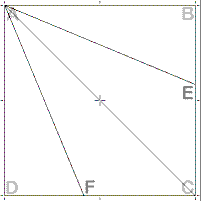 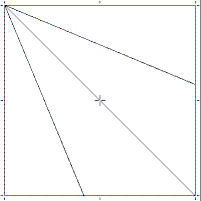 Fold in half diagonally, then swing free corners B and D inwards in a circular arc until they touch the Mid-line fold AC in the 'folded fan' pattern shown here. 3. Half Cone (continued). Pitch midline AC along supporting rope. Secure corners B and D to ground. Stretch out points E and F, and secure to ground with ropes. |
1. Bivvy Bag (Cornet).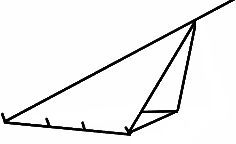 *Best* stability in windy conditions, IF set-up properly and staked out securely. 'Awning' on Lee end helps with weather control, although rain may trickle down rope. Fold in half diagonally, then swing free corners B and D inwards in a circular arc until they touch the Mid-line fold AC in the 'folded fan' pattern shown here. Use rope to support full length of mid-line fold AC (rope ridgepole). Secure 'Multi-Fold' corner A to ground, on Windward side. Support corner with free end of diagonal mid-line AC in air on Lee side (tie to tree, etc). Fold triangles ABE and ADF under at fold-lines AF and AE to make double groundsheets. Secure groundsheets to ground, reinforcing fold lines with taut ropes. 2. Bivvy Bag (Hunchback).  Use an internal pole to support tarp some distance back along Mid-line AC from point C. This can create a downward sloping awning that helps with weather control. 3. Half Cone. 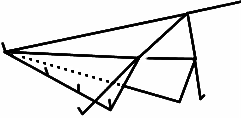 |
||||||||||||||||||||||||||||
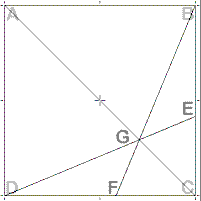 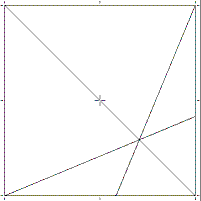 Fold tarp in half diagonally, use length of side AB or AD to find the 'Cross-Folds' point G on the diagonal Mid-line AC. |
Forrester.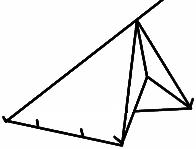 Good stability in windy conditions, IF set-up properly and staked out securely. 'Doorway' on Lee end helps with weather control. NOTE - Width of shelter depends on wall angles, the amount of headroom, where 'Cross-Folds' point G is, and on how the doorway is constructed. NOTE - Use of a taut rope to act as a ridgepole is recommended. Run rope from ground point A, UNDER the tarp fabric, through top of doorway frame, and on to final VSS anchor. Fold tarp in half diagonally, use length of side AB or AD to find the 'Cross-Folds' point G on the diagonal Mid-line AC. Secure corner A of diagonal mid-line fold AC to ground on Windward side. Use a rope to support full length of mid-line fold AC (rope ridgepole). Support 'Cross-Folds' point G in air on Lee side. Spread triangles ABG and ADG to create walls. When taut, secure B and D to ground. Fold CEG and CFG underneath BEG and DFG to create partial walls from BEG and DFG that frame a low doorway. When satisfied with doorway, secure folded cloth with Tarp Clips, lashings, pegs, etc. Top of doorway where E meets F may be pulled forward to make a better awning. |
||||||||||||||||||||||||||||
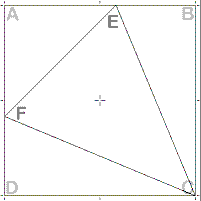 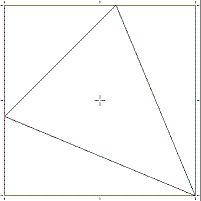 Fold Angles are 45° and 22.5° around point C, and 67.5° for bases of main wall and doors. From a 10' x 10' Tarp, the main wall has a base of 8.2842 units, sides of 10.8239. Doors have a base of 4.1421, vertical door sides are 10, and sloping corner sides are 10.8239. |
End.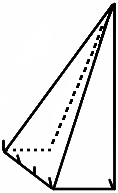 This is half of the Miner's Tent, adapted to make an end with doors for an A-frame fly. 'Multi Fold' corner C will be the top/peak. The large middle triangle CEF will be an end wall, while the two smaller long sided triangles BCE and CDF will be door flaps. Triangle AEF will become a partial groundsheet. Support Multi Fold corner C in air, from same support as the A-Frame fly mid-line. Match the free edges of the door flaps with ends of an A-Frame fly, and secure to ground. Stretch out and secure the rest of the door flaps. |
||||||||||||||||||||||||||||
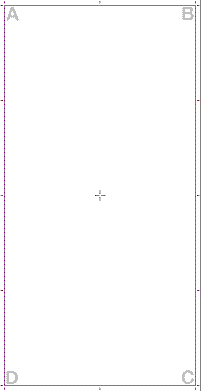 No Folding is necessary. NOTE - If using the Mushroom model, the rooflines from the centre pole to the tarp corners will vary in curvature depending on whether or not the tarp is a 'plastic' poly-tarp, or is a 'fabric' rip-stop nylon fly. If well-defined ridges are needed, use either ridgepoles, or taut ropes. |
Generic Rectangular Tarp (sides in 1:2 ratio). Midpoint of tarp shown by crosshairs, mid-sides shown by a short line. 1. Ground Sheet.  Lay tarp on ground and secure 4 corners for easy to clean living surface. 2. Lean-To.  Secure 2 corners of one side to ground on Windward side. Support 2 corners of opposite side in air on Lee side. 3. Fly Sheet.  Support 4 corners in air to make a weather shield. 4. Mushroom.  Support centre point in air. Use pole with round object on tip to avoid damage to tarp. Secure corners A, B, C, and D to ground. |
||||||||||||||||||||||||||||
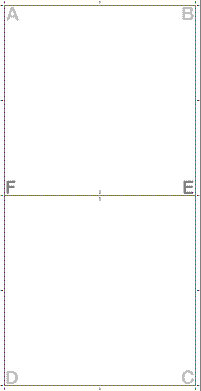 Fold shown at Half-way mark. In most Real Life cases, the fold line will depend on the amount of ground cover required... 4. Envelope (Fold Under) Continued... Secure lower half to ground, with fold on Windward side. Support free corners in air, on Lee side. |
1. Doubled Wall Lean-To. Fold in half. Support mid-line fold EF in air. Secure hanging corners to ground on Windward side. 2. A-Frame Fly.  Support mid-line EF in air, low enough that the 4 corners A, B, C, D lie loosely on the ground. Move an edge lying on the ground (AB or CD) away from the mid-line EF, until the fabric is taut, and the edge begins to lift from the ground. Secure spread edge to ground, and repeat process in the opposite direction with other trailing edge. 3. Wind Shed (Fold Over).  Secure an edge (AB or CD) to ground on Windward side. Support mid-line FE and remaining corners in air on Lee side. 4. Envelope (Fold Under).  |
||||||||||||||||||||||||||||
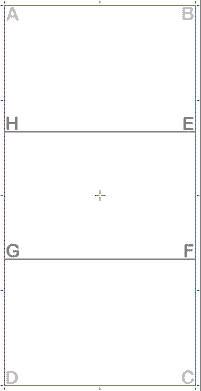 Folding in Thirds - measure or 'estimate' fold marks by folding tarp so the ends overlap, then adjust the amount of 'over fold' until there is no spare material left that isn't overlapped. 3. Square Arch (Continued). Support points E, F, G, and H in the air, secure corners to ground. Greater headroom, straighter walls, but 'angle' the slope of roof or rain and debris will collect. |
1. Tube Fly. 10' x 20' Tarp creates a Tube Fly with 60° walls, 5.773 high, with floor space of 10 x 6.666 (walls and floor are 6.666). Fold tarp into thirds. Secure 4 corners of one end-third to ground, with unfolded edge on Lee side. To keep the ground fold on the Windward edge straight, reinforce with a taut rope running along the fold inside the tent. Turn middle section into sloping wall by supporting the fold line between it and last end-third section in air over the ground. Secure free ends of last end-third section to ground on Lee side. 2. C-Fly (Wind Shed).  Pitch as Body Bag above, but support free ends of last end-third section in air on Lee side as an awning. Angle down for better weather control. 3. Square Arch.  |
||||||||||||||||||||||||||||
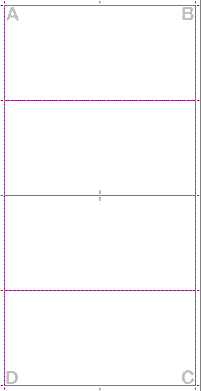 Plan shown folds at quarter marks - adjust as needed for desired result. |
1. Tube Fly (with doubled groundsheet) Fold tarp into Quarters. Secure 4 corners of one end-Quarter to ground, unfolded edge on Lee side. To keep the ground fold on the Windward edge straight, reinforce with a taut rope running along the fold inside the tent. Turn two middle sections into sloping wall and roof by supporting the fold line between them in the air, and also supporting the fold line between the 'roof' segment and the last Quarter in the air. Secure free ends of last end-quarter section to ground on Lee side. 2. Square Arch (with groundsheet). 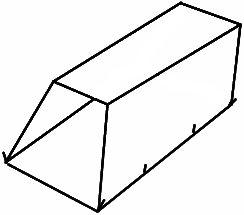 One Quarter fold becomes the groundsheet, the next segment becomes a wall, the third segment becomes a roof, and the last segment is the last wall. Angles on wall and roof can be varied, with a sloping trapezoidal set-up being stronger and more weather worthy than an elongated box. 3. Tube Arch. Set up as per Tube Fly or Boxed Arch, but use flexible dome tent rods to make semi-circles out of tube ends. |
||||||||||||||||||||||||||||
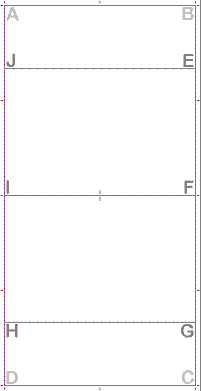 Fold in Half, then fold each Half into Thirds. Small rectangles are the end-third of each Half. The size of the end walls can vary as required. |
1. Walled Fly.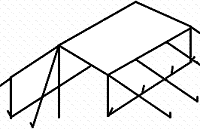 Support ends of mid-line fold FI in air. Run guy lines from points E, G, H, and J to ground. This keeps the roof sections taut and angled without the need for poles. Use Tarp clips to create wall tension points along fold lines EJ and FI. Run lines to ground. Secure corners A, B, C, and D to ground, making vertical or sloping walls. 2. Tube Fly (with split groundsheet). 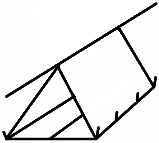 10' x 20' Tarp creates a Tube Fly with 60° walls, 5.773 high, with floor space of 10 x 6.666 (walls and floor are 6.666) Support ends of midline fold FI in air. Secure four corners of A, B, C, D to ground directly beneath midline fold. Stretch loose folds of tarp out along ground until walls FGHI and EFIJ are taut. Secure E, G, H, J (edges of groundsheet and corners of walls) to ground. 3. Tube Arch. Set up as per Tube Fly, but use flexible dome tent rods to make semi-circles out of tube ends. |
||||||||||||||||||||||||||||
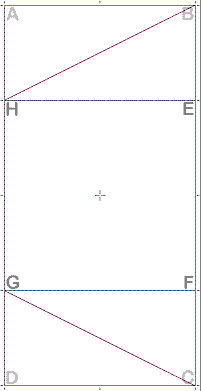 Pattern shown, folds at end quarter-lines, then diagonally divides the end quarters. |
Bakers (Wind Shed).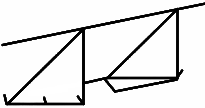 Secure edge GH of main rectangular wall EFGH to the ground, on Windward side. Square up floor plan by securing the stake points of the partial groundsheet triangles ABH and CDG. This helps locate stake points of side walls BEH and CFG. Stake out other base points B, C of side walls. Support Top edge EF in air on Lee side. |
||||||||||||||||||||||||||||
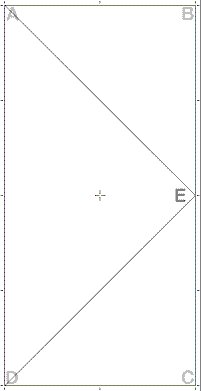 Diagonal folds go from midpoint of a long side, to the corners of the opposite long side. |
Holden (also called a Rectangular Tent).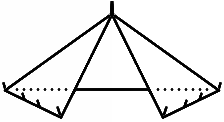 NOTE - Width of shelter depends on wall angles and amount of headroom. These are adjustable. Support Multi-Fold point E in air. Adjust headroom to suit. Spread corners A and D back from Multi-Fold point E to make rear wall of triangle ADE. Secure A and D to ground on Windward side. Spread corners B and C on Lee side until side walls ABE and CDE are taut. Secure B and C to ground. |
||||||||||||||||||||||||||||
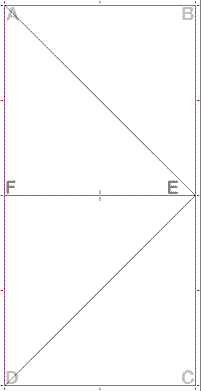 Fold in half short ways (parallel to the short edge), then fold each half diagonally in half. 2. Cornered Stall (continued). Secure diagonal fold line corners A and D, and point F directly to ground in three points of a square. This will put point F directly beneath Multi-fold point E Remaining corners of B and C come together to complete an awning for a pyramid lying on its side. They need support for best effect. |
1. Floating Pyramid.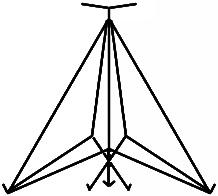 This design 'floats' a pyramid shaped fly in the air, with enough ground clearance to let the breeze through underneath. Support Multi-Fold point E in air. Corners A, D with diagonal fold-lines, and one end F of the mid-line EF are pulled into 3 corners of a pyramid. Secure diagonal fold line corners A and D directly to ground. Use a rope to secure point F to the ground, and keep fold line EF taut. Remaining corners of B and C come together to complete the pyramid, or stay open as a doorway. 2. Cornered Stall. 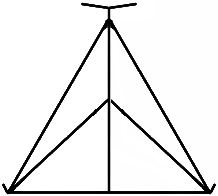 Something suitable for a sheltered position, like in a flea market where a square footprint and vertical walls are needed. Support Multi-Fold point E in air. Corners A, D with diagonal fold-lines, and one end F of the mid-line EF are pulled into 3 corners of a pyramid. |
||||||||||||||||||||||||||||
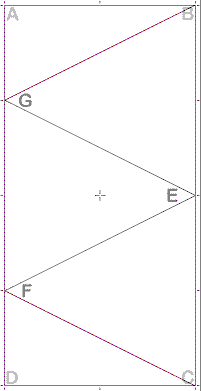 All fold points are from the end, quarter, or half way marks of the long sides. 2. Closed Tetrahedra (continued). The half triangles ABG and CDF become fully functional door flaps. Support points B and C in the air. The 'back walls' will need extra lashings to close the gap between their edges up and make the tent 'secure'. |
1. Open Pyramid. 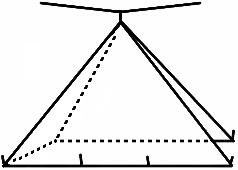 Floor space depends on size of the gap between left and right walls. These are adjustable. Secure base points F, G of middle triangle EFG to ground. Square up floor plan by using fold lines of BG and CF to show where stakes go on ground. Stake base points B, C of side walls to ground. Fold corner triangles of ABG and CDF underneath as partial groundsheets. Support Multi-Fold point E in the air to tauten walls. 2. Closed Tetrahedra (with full groundsheet). 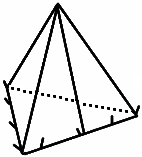 Make a closed tent with full groundsheet. This pattern on a 10' x 20' tarp creates Isosceles triangles. Equilateral triangles come from using a 8.66 x 20 tarp, or just redrawing the design on a tarp so that the 'excess' goes on the 'back walls' and doors/main groundsheet for use as lashing and mud-guards. Using the large middle triangle EFG as a ground sheet, the two side triangles BEG and CEF fold up to become walls that meet at BE and CE. |
||||||||||||||||||||||||||||
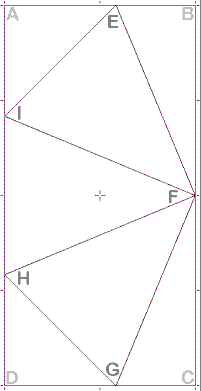 Fold Angles are 45° and 22.5° around point F, and 67.5° for bases of main walls and doors. From a 10' x 20' Tarp, the main walls have a Base of 8.2842 units, sides of 10.8239. Doors have a base of 4.1421, vertical door sides are 10, and sloping corner sides are 10.8239. NOTE - In the olden days, internal 4-poled pyramid frames (one in each corner) provided exceptional stability. |
Miner's Tent (also called Pyramid Tent, Square Tent, Range Tent, etc - has partial groundsheet).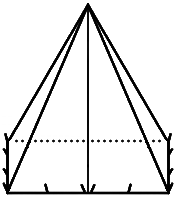 Make a closed tent with real doors, and a partial groundsheet. Width of tent depends on tarp sides being exactly 1:2. A 10' x 20' Tarp creates a Miner's Tent 9.10 high, with floor space of 8.28 x 8.28. Secure base points H and I of middle triangle FHI to ground. Square up floor plan by securing the stake points of the partial groundsheet triangles AEI and DGH. This helps locate stake points of other walls. Stake out other base points of main walls. Support Multi-Fold point F in the air. Secure door flaps to ground, and to each other.
NOTE - triangles AEI and DGH form a partial groundsheet that covers half the floor space. NOTE - Versions with 'flatter fronts' are made by moving points E and G back towards the edge AD, or to the midpoints of the short sides. |
Q: What are Tarp-shelters?
A: Tarp-shelters are simple shelters made from a Vertical Support System, rope, ground stakes, a single tarp (fabric or plastic), and ingenuity.
Q: What's a Vertical Support System?
A: Any way or means of providing a fixed point above the ground, from which something can be hung from, or hung on. VSS include traditional tent poles, internal or external frames (skeleton, shears), rope slung between two supports (trees, etc), or an overhead suspension point (tree branch, etc).
Q: What sort of rope?
A: 6-millimetre poly or nylon rope is a good size, with 10-millimetre better in many situations. Smaller diameter ropes may suffice, IF they're 'doubled' up.
Q: What sort of ground stakes?
A: Tent and Fly stakes designed for 'hard ground' are often no more than a metal spike, and can pull out if the ground is softened by rain. Tent and Fly stakes designed for 'soft ground', have shafts with an 'angled' or 'star' cross-section, and grip any sort of ground better than 'spike' stakes do - they may be harder to hammer in, but they're harder to get out as well!
Q: What sort of flexible material?
A: Canvas, nylon tent fabric, poly-tarps, or heavy-duty plastic sheeting like painter's drop sheets. Ideally, the material should be either a Square, or a Rectangle with the long side twice the length of the short side.
Q: These 'do-it-yourself' designs look like some of the Tent and 'Tarp-tent' shelters sold in Camping Stores, but without the $$$ price tag. What gives?
A: Tents and 'Tarp-tents' sold in camping stores incorporate high quality of design, modern materials, and professional manufacturing. These things cost extra, but guarantee durable and reliable service in extreme situations and emergencies! For that matter, Tents sold in Camping Stores usually include insect nets that keep out mosquitoes (and any diseases they carry!), and sewn-in tub floors that keep mud and water out (not to mention ants, snakes and spiders).
Q: Oh... But can't I put a groundsheet and insect mesh in a Tarp-shelter?
A: You could try, but let's face it! The end result probably wouldn't be as good, nor as reliable, nor as durable, as a Professionally made 'proper' tent.
Q: If it's not as good as a 'proper' tent, what CAN I use a Tarp-shelter for?
A: Depending on the particular design and the specific situation it will be used in, the 'DIY' Tarp-shelter can provide privacy (beach, bush, etc), shade from the sun, and shelter from the wind, rain, and even cold. Ask yourself what you really want the Tarp-shelter for. Is it a hands-on project meant to build self-confidence? A cheap playroom for children in the back yard? A sleepover project for a Youth Group? A lightweight shelter to take when Hiking? An emergency backup to the tent you take when Camping?
Q: Emergency backup? How do these Tarp-shelters handle rain and high winds?
A: That depends on various things. Remember, storms wreck houses, so don't expect fabric and rope to do any better. If in doubt, only use in fair weather.
- Base Design - some are inherently more weather worthy than others are.
- Set-up - is the Tarp-shelter facing the wind in the right way?
- Ropes - are the ropes taut?
- Stakes - is it securely staked down? Extra stakes may be needed!
- Wind - How strong is the wind? Is it blowing the rain 'sideways'?
- Seepage - will rain seep down the ropes and seams into the Tarp-shelter?
- Condensation - will condensation on the walls pool inside the Tarp-shelter?
- Rising Damp - is the ground under the Tarp-shelter wet or humid?
- Run-off Water - will water pool in or around the Tarp-shelter?
- Fabric - how 'waterproof' is the tarp material itself?
Q: Can I cook inside a Tarp-shelter?
A: Uh-oh, that's definitely ~NOT~ Recommended! Especially ~NOT~ with any of the 'synthetic' and thus Highly Flammable tent and tarp fabrics! While some of these do claim to be 'fire retardant', it's ~NOT~ a claim I'd risk my life on! And before you ask, the advice AGAINST cooking inside a Tarp-shelter extends to all other forms of combustion, such as candles and fuel lamps, mosquito coils and incense, and even to cigarettes! All of these things burn a combustible fuel, and all are sources of potential fires!
Q: Well, can I cook near a Tarp-shelter, have a fire near one, or use any of those 'other forms of combustion' mentioned above near a Tarp-shelter?
A: Ah, well... It depends on the stove/fire, and whether or not radiant heat, embers, sparks, or other hot materials can affect the Tarp-shelter! Even if the source of heat doesn't actually touch the tarp fabric, it may still transfer enough heat through the air (radiant heat), to 'melt' or ignite the tarp!
Q: I see... Where can I get the basics to make my own Tarp-shelter?
A: Most hardware stores and larger supermarkets, or any good camping store.
Q: There's a bewildering variety of gear available. What should I get?
A: First off, make paper models of the designs. When you have the basic concept down pat, go and buy the CHEAPEST plain tarp you can! Don't worry, it'll last long enough to learn with! And when you 'wear it out', you'll have a good excuse to go buy a better one (as well as a good idea of what you need for the particular design/s you want to use ;). Recycle the 'worn out' tarp into patches, 'grommet insertion' test facility, 'Rambo Raincoat', groundsheet, etc. ~HOWEVER~, if you include a tarp in your camping gear, buy a decent quality one, one that won't 'break' and cause problems when you're out in the bush.
Q: How do I transfer these Folding Patterns onto a real tarp?
A: Most of the patterns use 'natural' crease lines, the ones created when folding a tarp in half, thirds, etc. To make a 'pattern', use a pen to make 'alignment marks' for easier reference. If necessary, use a tape measure and protractor (device for measuring angles), and a straight-edged board as a ruler.
Q: What if I need to put extra grommets in the tarp to take ropes, etc?
A: You can adjust most of the Folding Plans to use existing grommets. Hardware and Camping stores will have grommet kits, but ask if they have 'Tarp-Clips'. Tarp-Clips go by a variety of names, but they are reusable, and can go anywhere on a tarp without making holes! Larger Tarp-clips are stronger, as they 'grip' more of the tarp fabric than smaller clips. You might even be able to hang the tarp over poles and ropes, and secure it where you can.
Q: How do I get my Tarp-shelter to have 'geometrically' straight sides, etc?
A: The Tarp-shelter doesn't NEED to look 'geometrical' to work, but it will work better if the walls are taut and straight, rather than limp and saggy. Just as a 'ridgepole' in an A-Frame tent keeps the roofline straight and improves the stability of the structure, so too, can a framework of poles or taut ropes (internal or external) improve a Tarp-shelter's stability. Extra ground stakes will help, as will a 'daisy-chained' rope.
Q: What's this about a 'daisy-chained' rope?
A: Tarps have a rope running under the edge of the hem, this rope reinforces the tarp, and helps spread the load over more of the tarp fabric. A 'daisy-chained' rope is a way of providing similar reinforcement. One way weaves a rope in and out of all of the grommet holes. Another way only pushes a loop of thin rope through each grommet hole and ties it off, with the rest of the rope on the other side of the tarp to the loops. In both cases, the rope itself can become the main supporting structure, with the rope/loops becoming lash points, and the tarp hanging/draped from the taut rope like a curtain.
Q: Okay, you've sold me on the idea, but is there anything else I should know?
A: Funny you should say that... You can estimate the size of a Tarp-shelter that will result from a specific design, given a tarp of a particular size. For that you'll need pen, paper, a calculator with SQUARE ROOT and SINE function keys, and Appendix #1 - Basic Trigonometry... Then there's the Miscellaneous stuff...
=========================================
Miscellaneous Stuff
=========================================
Copyright Notes - ~ALL~ illustrations in this document were 'drawn' by the Author using a variety of computer graphic programs (including MetaCreations Painter 3D, Microsoft Paint, and Microsoft Photo Editor).
As far as the Author of this document is aware, the Intellectual information behind the tarp folding patterns themselves are in the Public Domain, and have been since the days of the Early Colonial Settlers and Pioneers. As far as the Author of this document is concerned, his OWN illustrations may be used and copied FREE OF CHARGE for Non-Commercial purposes. Non-Commercial includes use by Non-Profit Groups, Educational Institutions, Youth Groups, Campers, etc.
Sources of information regarding the patterns include the websites, 'Tarp Tents' http://www.hufsoft.com/bsa51/page2.html, 'Tent Making Made Easy By H.J. Holden' http://home.earthlink.net/~lil_bear/tent.htm, and 'Buckskin BSA (Boy Scouts of America)' http://www.buckskin.org/Site_Map.htm. As well as the book 'Camping in the Old Style' by David Wescott, ISBN 0-87905-956-7, published by 'Gibbs Smith' in Salt Lake City, Utah, USA. These sources refer to books published in the early 1900's, and state that some designs are 'Traditional'.
Please Note - Drawings in this document are ~NOT~ 'exact scale'! They are only ~GUIDES~ to what the Folding Patterns and finished Tarp-shelters look like! In most of these designs, floor width and headroom are adjustable at the expense of each other - just change the wall angles, and the others will follow.
All Folding Plans have the four corners named A, B, C, and D. The naming of all other points is Clockwise from point A at the Top-Left corner of the diagram, ending with any 'internal' points. Some designs have notes on sizes for the finished Tarp-shelter - these are mathematical estimates, created as a mental exercise in Trigonometry. Check for accuracy before use!
NOTE - ~NONE~ of these Tarp-shelters are 'insect proof', and few have any sort of groundsheet (sod cloth). You can add Groundsheets if you wish, and mosquito nets can be hung from the VSS, or attached with tarp clips, Velcro, etc.
VSS (Vertical Support Systems)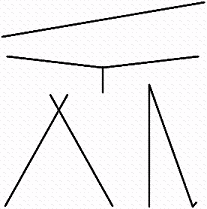 |
Top - basic line strung between two fixed objects. Usually either from ground to a tree, or between two trees. Second Top - single overhead hanging support. Usually from an overhanging tree branch, or from a rope line. Bottom Left - two poles lashed together to make a 'Shears' frame. A rope is slung between the upper angle. Useful for areas without trees. Bottom Right - traditional tent pole, guy line and ground stake. The 3-poled Tripod and 4-poled Pyramid frames, offer a skeleton you can drape a tarp over, or an external frame to support an overhead style VSS. |
- Windward, direction wind blows FROM, side facing INTO wind, side wind hits.
- Lee, direction wind blows TO, side facing AWAY from wind, sheltered side.
- Ridgeline, top of a roof, usually at the junction of two sloping sides.
- Ridgepole, pole used to reinforce the ridgeline of a tent or fly.
- Guy lines (Guy ropes), ropes used to secure a tent/fly or tent poles.
Tarps are usually either cotton canvas (with or without integrated synthetics reinforcing the weave or the stitching), or a woven nylon fabric (as in tent fabric), or 'poly' tarps. The type of fabric used will affect the appearance of the Tarp-shelter. The woven fabrics have more flex, and result in shelters with curving walls and rounded angles when the fabric is under tension. Poly tarps have less flex, due to their construction.
Poly tarps are made of Polyethylene, and are usually blue, green, or silver. They have sewn or heat-sealed seams, a rope sewn into the hem, grommets every 3 feet or so, and reinforced corners with grommets. Standard lightweight poly tarps are 1000 denier material in a 10 x 10 mesh, with 0.04 mm lamination on each side. Heavy-duty tarps have a tighter 14 x 14 mesh, and thicker laminate.
The given 'size' of a Tarp, is often the size of the fabric blank before hemming. This means that the final product may vary by a few inches from the stated size.
If you're eager to try these set-ups but are not sure which tarp size to go for, we can help you choose your tarp. You can also find out more about the kinds of suspension and knots we suggest using for hammock camping.
 US | USD


