IE | EUR
 .jpg)
Knots
There aren't really any 'set rules' as to which knots you should use in hammock suspension. In fact, if your hammock has been fitted with a whoopie suspension system, the need for knots is eliminated altogether! However, we do have our favourite knots and you can find out how to tie them below.
The falconer's knot or the mooring hitch are ideal for tying your hammock to a tree. There are however plenty of other knots that work just as well.
For those without a good knowledge of knots, a simple yet effective option is to use the same knot you use to tie your shoes! Plenty of experienced tree-dwellers do this.
The shoelace knot
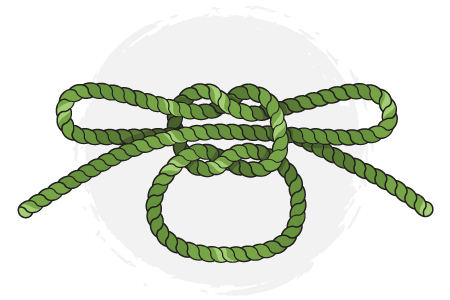
The most common method of tying a bow is:
- Form a loop
- Circle the first loop with the other piece of string
- Push the bight of that string through the knot to form the second loop
It works best if you first wrap the rope around the tree a couple of times, taking the two ends opposite ways around the tree. For a more secure finish, loop one of the ends and tie to the free end, allowing for quick release.
The falconer's knot
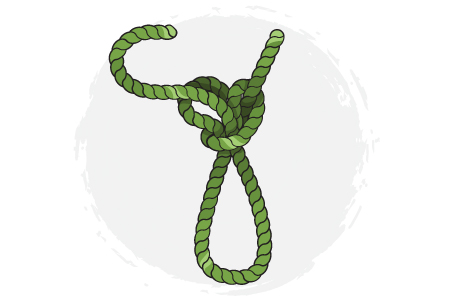
- Pass the rope anti-clockwise around the perch or glove, with the tail end to the left
- Place the right hand, palm up, underneath both pieces of rope and grip the tail piece (left) between the first finger and middle finger, as if cutting the rope with scissors. The other fingers are below, not in use at the moment
- Place the thumb through the two pieces, over the "scissors" and under the second bring it to the right, as if one was hitchhiking
- Keeping the thumb in the same position, rotate the wrist to the right so that the back of the hand is facing up
- The thumb will have made a loop. With the pinched first and middle finger put the "scissored" rope through the "hitchhiker's" loop
- Pass the free end through the new loop to secure
To untie, simply pull out the free end and tug firmly.
The mooring hitch
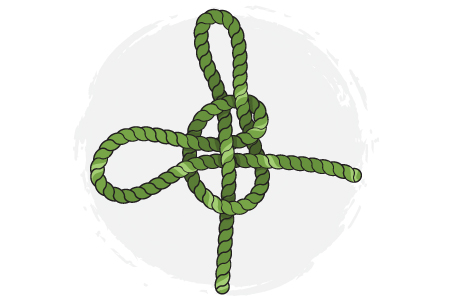
- Make a turn around a post and then form a loop with the free end exiting the loop on the inside (leave longer free end than illustrated)
- Grasp the standing line and pull a section through your loop
- Grasp a section of the free end (but not the very end) and pull part way through the new loop
- Tighten the knot by pulling down on the standing line. Release the knot by pulling the free end
If you're feeling confident, why not check out our suggestions for the types of suspension you can use in your hammock set-up along with some more advanced tarp set-up tutorials? If you're unsure about which hammock to get, you can also check out our hammock comparison chart.
DD Charity Update - June 2024